
View的绘制流程

今天我们来走一遍view的绘制流程,从setContentView(),到measure()
走的Activity流程
setContentView(R.layout.activity_main)
Activity.java
public void setContentView(View view) {
getWindow().setContentView(layoutResID);
initWindowDecorActionBar();
}
mWindow = new PhoneWindow(this, window, activityConfigCallback);
PhoneWindow.java
@Override
public void setContentView(int layoutResID) {
.....
installDecor();
.....
mLayoutInflater.inflate(layoutResID, mContentParent);
.......
}
我们先不急,搞清楚phoneWindow里面控件
private void installDecor() {
if () {
......
mDecor = generateDecor(-1);
} else {
mDecor.setWindow(this);
}
.....
mContentParent = generateLayout(mDecor);
.....
}
<p>protected DecorView generateDecor(int featureId) {
......
return new DecorView(context, featureId, this, getAttributes());
}</p>
<p>public class DecorView extends FrameLayout</p>
<p>protected ViewGroup generateLayout(DecorView decor) {
....
else if ((features & (1 << FEATURE_NO_TITLE)) == 0) {
// If no other features and not embedded, only need a title.
// If the window is floating, we need a dialog layout
if (mIsFloating) {
........
} else if ((features & (1 << FEATURE_ACTION_MODE_OVERLAY)) != 0) {
layoutResource = R.layout.screen_simple_overlay_action_mode;
} else {
// Embedded, so no decoration is needed.
layoutResource = R.layout.screen_simple;
// System.out.println("Simple!");
}
......
mDecor.onResourcesLoaded(mLayoutInflater, layoutResource);
mDecor.setWindowBackground(mBackgroundDrawable);</p>
<pre><code> ViewGroup contentParent = (ViewGroup)findViewById(ID_ANDROID_CONTENT);
}
public static final int ID_ANDROID_CONTENT = com.android.internal.R.id.content;
screen_simple.xml
<LinearLayout xmlns:android="<http://schemas.android.com/apk/res/android>"
android:layout_width="match_parent"
android:layout_height="match_parent"
android:fitsSystemWindows="true"
android:orientation="vertical">
<ViewStub android:id="@+id/action_mode_bar_stub"
android:inflatedId="@+id/action_mode_bar"
android:layout="@layout/action_mode_bar"
android:layout_width="match_parent"
android:layout_height="wrap_content"
android:theme="?attr/actionBarTheme" />
<FrameLayout
android:id="@android:id/content"
android:layout_width="match_parent"
android:layout_height="match_parent"
android:foregroundInsidePadding="false"
android:foregroundGravity="fill_horizontal|top"
android:foreground="?android:attr/windowContentOverlay" />
</LinearLayout>
void onResourcesLoaded(LayoutInflater inflater, int layoutResource) { ...... final View root = inflater.inflate(layoutResource, null); ..... addView(root, 0, new ViewGroup.LayoutParams(MATCH_PARENT, MATCH_PARENT)); ...... }
到此我们的setContentView就全部走完了,setContentView,初始化了DecorView 并把layoutResID加载到了mContentParent 也就是 android:id="@android:id/content" 里面,但是我们没有看到measure(),并对他一无所知,此时我们开始追一下phonewindow
final void attach(Context context, ActivityThread aThread,
Instrumentation instr, IBinder token, int ident,
Application application, Intent intent, ActivityInfo info,
CharSequence title, Activity parent, String id,
NonConfigurationInstances lastNonConfigurationInstances,
Configuration config, String referrer, IVoiceInteractor voiceInteractor,
Window window, ActivityConfigCallback activityConfigCallback, IBinder assistToken) {
attachBaseContext(context);</p>
<pre><code>    mFragments.attachHost(null /*parent*/);

    mWindow = new PhoneWindow(this, window, activityConfigCallback);
    ......
}
我们通常知道在oncreat中根本拿不到控件的view的宽高,在子线程中更新ui会报错,viewRootImpl,因为报错是因为ViewRootImpl中检查线程了,view一直向上递归到了ViewRootImpl,viewRootImpl大概就是DecorView 的父类了,那么ViewRootImpl是怎么和DecorView 产生关系的。
我们追追ViewRootImpl是怎么创建的,看一眼ViewRootImpl的构造函数,很难发现是谁调用了,这就很犯难,这时就只能用debug看看调用栈了,实在是没有办法了
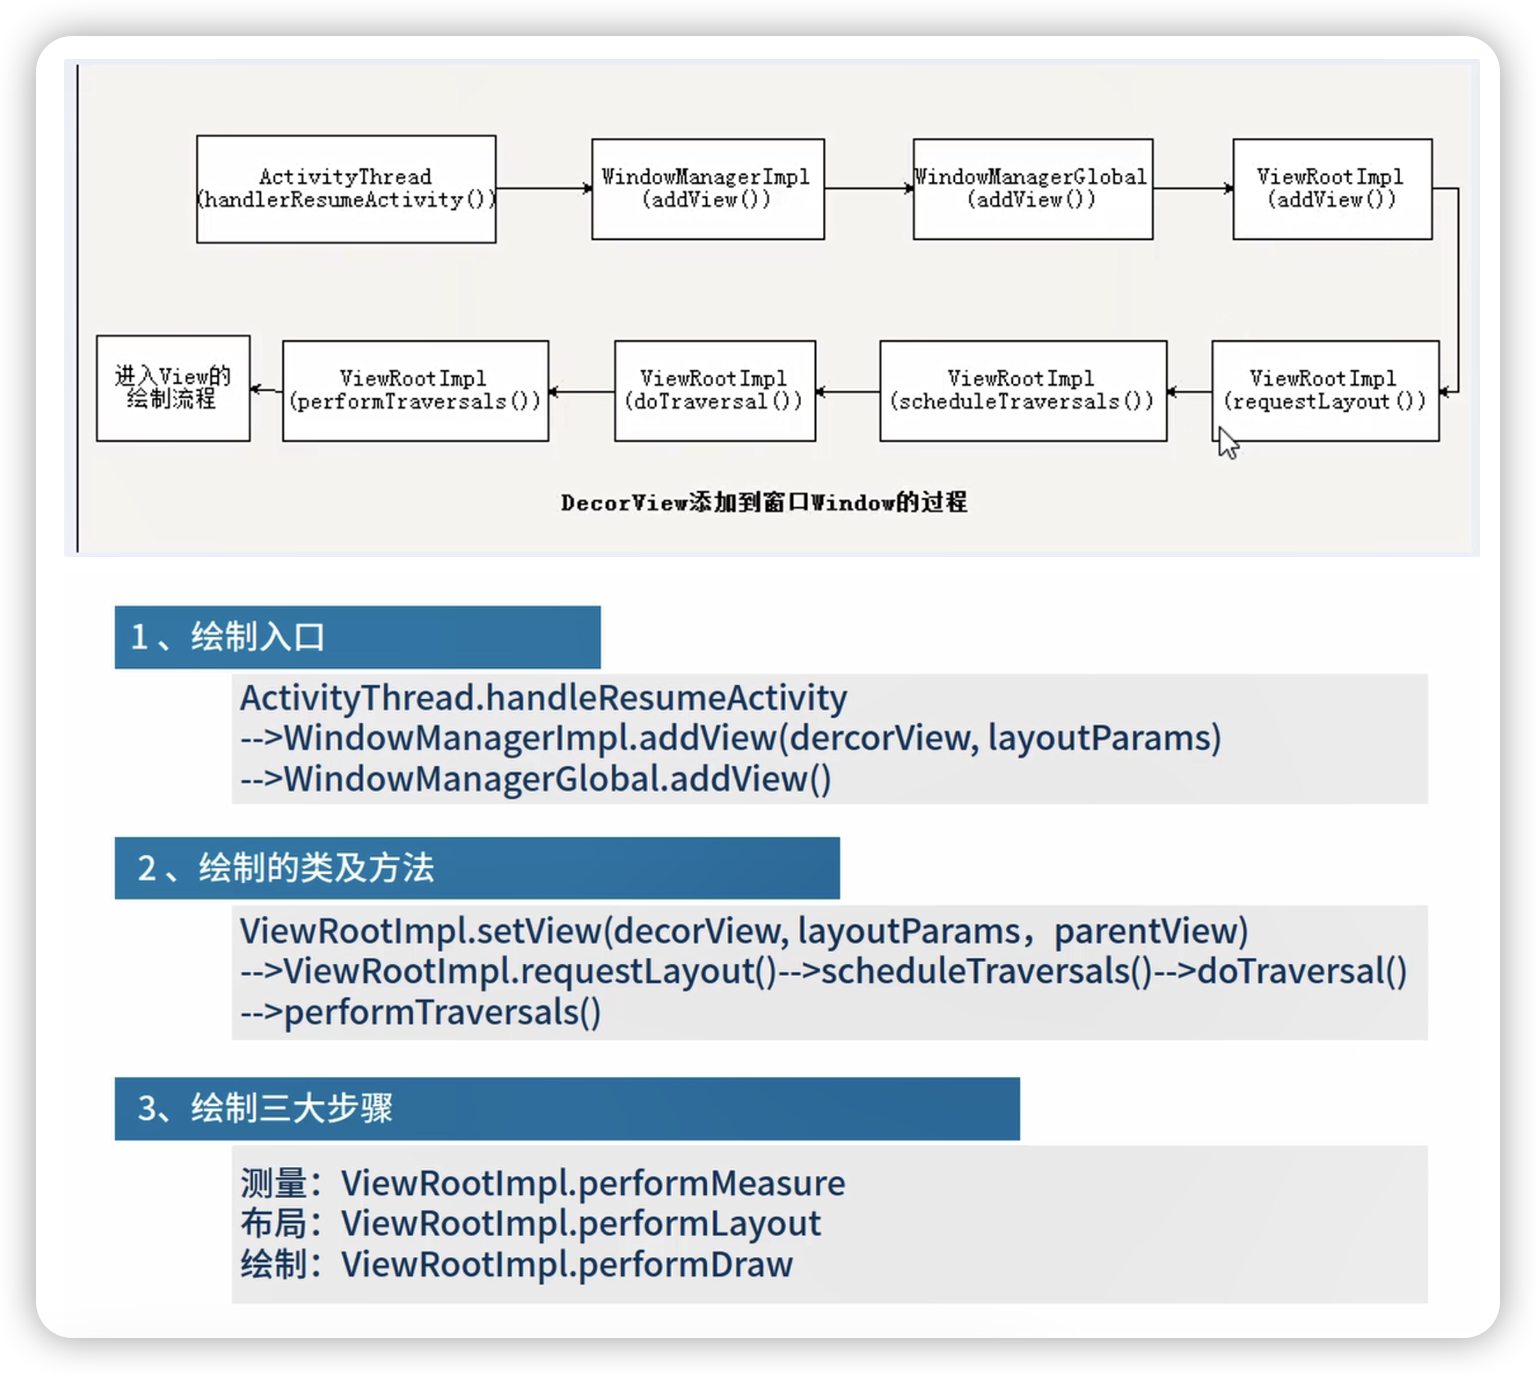
1.WindowManagerGlobal的addview ,关联了ViewRootImpl
2.WindowManagerImpl关联了WindowManagerGlobal
3.是在handleResume中进行的,这时我们就是看看WindowManagerImpl是怎么与Activity关联起来的
window.java
public void setWindowManager(WindowManager wm, IBinder appToken, String appName,
boolean hardwareAccelerated) {
mAppToken = appToken;
mAppName = appName;
mHardwareAccelerated = hardwareAccelerated;
if (wm == null) {
wm = (WindowManager)mContext.getSystemService(Context.WINDOW_SERVICE);
}
mWindowManager = ((WindowManagerImpl)wm).createLocalWindowManager(this);
}
哦哦,原来是Window的mWindowManager 呀
Activity.java
attcth()
mWindow.setWindowManager(
(WindowManager)context.getSystemService(Context.WINDOW_SERVICE),
mToken, mComponent.flattenToString(),
(info.flags & ActivityInfo.FLAG_HARDWARE_ACCELERATED) != 0);
现在我们就清楚了,Actvity有一个WindowManagerImpl添加view时增加了一个viewRootImpl
但是我们现在还是,不知道Activty是怎么将ViewRootimpl设为DecorView的父类的,但是我们现在有方向了,去看看handleOnresumeActvity,看看addview
@Override
public void handleResumeActivity(IBinder token, boolean finalStateRequest, boolean isForward,
String reason) {
......
final ActivityClientRecord r = performResumeActivity(token, finalStateRequest, reason);
.....
r.window = r.activity.getWindow();
View decor = r.window.getDecorView();
decor.setVisibility(View.INVISIBLE);
ViewManager wm = a.getWindowManager();
WindowManager.LayoutParams l = r.window.getAttributes();
a.mDecor = decor;
.......
a.mWindowAdded = true;
wm.addView(decor, l);
.....
ViewManager wm = a.getWindowManager();
View decor = r.window.getDecorView();
wm.updateViewLayout(decor, l);
}</p>
<pre><code>@Override
public void addView(@NonNull View view, @NonNull ViewGroup.LayoutParams params) {
applyDefaultToken(params);
mGlobal.addView(view, params, mContext.getDisplayNoVerify(), mParentWindow,
mContext.getUserId());
}
private final ArrayList<View> mViews = new ArrayList<View>();
private final ArrayList<ViewRootImpl> mRoots = new ArrayList<ViewRootImpl>();
public void addView(View view, ViewGroup.LayoutParams params,
Display display, Window parentWindow, int userId) {
root = new ViewRootImpl(view.getContext(), display);
.......
view.setLayoutParams(wparams);
mViews.add(view);
mRoots.add(root);
mParams.add(wparams);
......
root.setView(view, wparams, panelParentView, userId);
}
public void setView(View view, WindowManager.LayoutParams attrs, View panelParentView,
int userId) {
........
view.assignParent(this);
........
}
到此我们就把Actvitty怎么创建viewRootImpl,怎么使得viewRootmpl当上DecorView全部走通了,就剩一个了,ViewRootImpl什么时候调用的绘制,注意这个handleResumeActivity的updateViewLayout
@Override
public void updateViewLayout(@NonNull View view, @NonNull ViewGroup.LayoutParams params) {
applyDefaultToken(params);
mGlobal.updateViewLayout(view, params);
}
public void updateViewLayout(View view, ViewGroup.LayoutParams params) {
......
root.setLayoutParams(wparams, false);
}</p>
<p>void setLayoutParams(WindowManager.LayoutParams attrs, boolean newView) {
.......
scheduleTraversals();
}</p>
<p>void scheduleTraversals() {
......
pokeDrawLockIfNeeded();
}</p>
<p>void pokeDrawLockIfNeeded() {
......
mChoreographer.postCallback(
Choreographer.CALLBACK_TRAVERSAL, mTraversalRunnable, null);
}</p>
<p>final class TraversalRunnable implements Runnable {
@Override
public void run() {
doTraversal();
}
}</p>
<p>void doTraversal() {
.....
performTraversals();
.....
}</p>
<p>private void performTraversals() {
......
windowSizeMayChange |= measureHierarchy(host, lp, res,
desiredWindowWidth, desiredWindowHeight);</p>
<pre><code>    ....
    windowSizeMayChange |= measureHierarchy(host, lp,
            mView.getContext().getResources(),
            desiredWindowWidth, desiredWindowHeight);

    performMeasure(childWidthMeasureSpec, childHeightMeasureSpec);

    performMeasure()

    performLayout(lp, mWidth, mHeight);

    performDraw();
}
到此我们就知道view是在什么时候绘制了,还有一点是,不同的window.addview的时候回创建不同的ViewRootImpl,也就是说,子线程可以使用window,添加view,修改view的ui

评论区